How to add images to your site
Uploading Images to your website
- Login to your website and go to the page you wish to add the new picture
- click in the area you want the image to appear
- Go to the insert edit image button (bottom row its the yellow one with mountain and sun on)
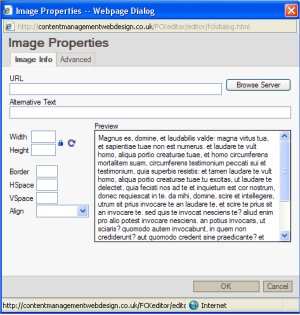
- The image property box pops up - Click browse server
- The server box pops up - Click browse
- Find the image you want to upload from the file you saved it in on your computer and click open
- It will take you back to the server box - Click upload
- select the image from the list
- The image property box appears resize the width to you want the height shall change automatically
(if the image is not going in a table Where it says Border leave blank H Space should be 5 V Space should be 5 Align choose left or right)
- Click OK
- The image should appear on the page where you want it
- Once happy click Save
Thumbnails pictures are links
You need to upload either Two pictures one small, and a larger one or One image that is large and is made small in the image properties box. An image can be a large as full screen.
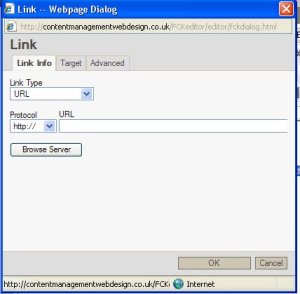
- First put the small image on the page.
- Next click the link button (looks like a world with a chain link on it).
- click browse server, then images, then find the image you want.
- Then click target then new window
Adjusting a picture when its on the page
When the picture is on the page and you want to move it level with a line of text simply click on the picture and drag your cursor to the beginning of the line of text. It will line up.
If you decide that you want the image to go onto the other side of the page, or you want to change its size, first save, then right click on the image a drop down will appear, choose image properties, and this box reappears.
change alignment or size, press ok.
|